
If you have pavers in your driveway, patio, or pool area, you know they add a beautiful touch to your home. But Florida’s weather—intense sun, heavy rain, and high humidity—can wear them down over time. Sealing your pavers is the best way to keep them looking great and lasting longer. If you’re wondering how to seal pavers in Florida, this guide will walk you through the process step by step.
Sealing your pavers isn’t just about making them look nice—it protects them from damage, prevents weeds and mold, and makes cleaning a whole lot easier. Let’s dive into why sealing matters and how you can do it the right way.
Why Should You Seal Your Pavers?
Pavers add beauty and value to your home, but Florida’s harsh climate can take a toll on them over time. Between the intense sun, heavy rain, and high humidity, unsealed pavers can quickly lose their color, shift out of place, or become covered in mold and stains. If you want your pavers to last and stay looking great, sealing them is one of the best things you can do.
A high-quality paver sealer acts as a protective shield, helping your pavers withstand the elements while making maintenance easier. Below, we’ll break down the biggest reasons why sealing your pavers is essential and how it can help you avoid common problems.
What Happens If You Don’t Seal Your Pavers?
Without a good sealer, your pavers are left exposed to Florida’s unpredictable weather. Here’s what can happen over time:
1. Fading from the Sun
- Florida’s sun is strong, and prolonged exposure to UV rays can cause pavers to lose their rich color.
- Over time, unsealed pavers may start to look washed out or dull.
- A quality sealer helps protect against fading by blocking UV rays and locking in the pavers’ natural color.
2. Erosion from Rain and Water Damage
- Florida gets a lot of rain, and heavy downpours can wash away the sand between pavers.
- When this happens, pavers can shift out of place, creating uneven surfaces and potential trip hazards.
- Sealing helps keep the sand in place, preventing movement and maintaining stability.
3. Mold, Mildew, and Algae Growth
- Florida’s humidity creates the perfect conditions for mold, mildew, and algae to grow on pavers, especially in shaded areas.
- Not only does this look bad, but it can also make pavers dangerously slippery.
- A good sealer prevents moisture from soaking into the pavers, reducing the risk of mold and algae buildup.
4. Stains from Oil, Dirt, and Other Contaminants
- Driveways, patios, and pool decks see a lot of use, which means spills and stains are inevitable.
- Oil from cars, food spills, dirt, and even rust can soak into porous pavers, making them difficult to clean.
- A sealer creates a protective barrier, preventing stains from penetrating and making cleanup much easier.
5. Weeds and Pests Taking Over
- The spaces between unsealed pavers are the perfect place for weeds to grow and ants to burrow.
- Over time, weeds can push pavers apart, while ants and other insects can create nests underneath.
- Sealing helps lock sand into the joints, preventing weed growth and keeping pests out.
How Does Sealing Make Maintenance Easier?
One of the biggest benefits of sealing pavers is that it significantly reduces the amount of upkeep needed. Here’s how:
- Repels Dirt and Grime – Sealed pavers don’t absorb as much dirt, so they stay cleaner longer.
- Makes Cleaning a Breeze – Spills and stains sit on top of the sealer rather than soaking in, making them easier to wipe away.
- Reduces Weed Growth – Sealing strengthens the sand in the joints, blocking weeds before they can take root.
- Protects Against Efflorescence – This white, powdery substance that sometimes appears on pavers is caused by salts rising to the surface. A sealer helps prevent this from happening.
Does Sealing Change the Look of Pavers?
Sealing can enhance the look of your pavers, depending on the type of sealer you choose.
- Natural Look Sealers – These provide protection without changing the color or finish of the pavers.
- Enhancing Sealers – These bring out the natural color of the pavers, making them look more vibrant.
- Wet-Look or Glossy Sealers – These create a shiny finish that makes pavers appear darker and more polished.
If you’re unsure which type of finish you want, talk to a professional about the best option for your space.
How Often Should You Reseal Your Pavers?
Sealing isn’t a one-and-done job. Over time, exposure to weather and foot traffic will wear down the sealer.
- Most pavers should be resealed every 2 to 3 years to maintain protection.
- High-traffic areas, such as driveways, may need sealing more frequently.
- If you notice your pavers looking dull, absorbing water, or becoming hard to clean, it’s probably time to reseal them.
How to Seal Pavers in Florida: A Step-by-Step Guide
Sealing your pavers is one of the best ways to protect them from Florida’s extreme sun, heavy rain, and high humidity. When done correctly, sealing keeps your pavers looking fresh, prevents fading, and reduces the risk of mold, weeds, and stains.
While the process is straightforward, it’s important to follow each step carefully to get the best results. Whether you’re sealing your pavers for the first time or refreshing an older seal, this guide will walk you through everything you need to know.
Step 1: Choose the Right Sealer
Before you start sealing, you’ll need to choose the right product for your pavers. Not all sealers are the same, and using the wrong one can lead to disappointing results. In Florida, where heat and moisture are constant factors, you’ll want a high-quality sealer designed for the climate.
What Are the Different Types of Paver Sealers?
There are two main types of sealers to consider:
- Water-Based Sealers
- Eco-friendly and low in VOCs (volatile organic compounds)
- Enhances the natural color of your pavers
- Allows moisture to escape, reducing the risk of trapped water
- Best for a natural, matte, or satin finish
- Solvent-Based Sealers
- Provides a glossy, wet-look finish
- Offers strong, long-lasting protection
- Can darken pavers and enhance color vibrancy
- May have stronger fumes during application
How Do You Choose the Best Sealer for Florida?
Consider:
- The finish you prefer: Do you want a natural look or a glossy, wet appearance?
- The paver material: Some sealers work better on concrete pavers, while others are designed for natural stone.
- The level of protection needed: If your pavers are exposed to heavy traffic, rain, and sun, a high-quality sealer with UV protection is ideal.
Step 2: Clean the Pavers
Before sealing, your pavers need to be completely clean. Any dirt, stains, or mold left behind will get sealed in, making them harder to remove later.
How Do You Properly Clean Pavers Before Sealing?
- Pressure wash the surface – A pressure washer removes dirt, grime, and debris. Use a low to medium setting to avoid damaging the pavers.
- Apply a paver cleaner – If your pavers have stains from oil, grease, or mildew, use a cleaner designed for paver surfaces.
- Scrub stubborn areas – For deep-set stains, use a stiff-bristled brush to work the cleaner into the surface.
- Rinse thoroughly – Remove all cleaning solution and debris.
- Allow the pavers to dry completely – This step is critical. Trapped moisture can prevent the sealer from bonding properly, leading to a cloudy or patchy finish. Let the pavers dry for at least 24 to 48 hours, depending on the weather.
Step 3: Add Sand to the Joints
Once the pavers are clean and dry, the next step is to fill the joints with sand. This helps keep the pavers stable, prevents shifting, and reduces weed growth.
What Type of Sand Should You Use?
- Regular Jointing Sand – This can also work but may wash away over time, requiring more frequent maintenance.
How to Properly Add Sand Between Pavers
- Sweep the sand into the joints – Use a push broom to spread the sand evenly, filling the gaps between each paver.
- Tap the pavers gently – Use a rubber mallet to help the sand settle.
- Remove excess sand – Sweep away any extra sand from the surface to avoid sealing it in.
- Lightly mist with water – If using polymeric sand, spray a light mist of water to activate the binding agents. Be careful not to over-saturate, as this can wash the sand away.
- Let the sand dry completely – Before sealing, allow the sand to set for at least 24 hours to avoid trapping moisture.
Step 4: Apply the Sealer
Now that your pavers are clean and the joints are filled, it’s time to apply the sealer. This step protects your pavers from weather damage, stains, and fading.
What’s the Best Way to Apply Paver Sealer?
- Use a pump sprayer or paint roller – A sprayer is best for large areas, while a roller works well for detailed application.
- Apply in thin layers – Thick coats can lead to streaks, bubbles, or an uneven finish.
- Let the first coat dry – Wait at least 2 hours before applying a second coat.
- Apply a second coat if needed – This enhances durability and gives a more even finish.
- Allow the sealer to cure – Keep foot traffic off for 24 hours and vehicles off for 48 hours to ensure proper bonding.
Common Mistakes to Avoid
- Sealing damp pavers – Moisture can cause the sealer to turn cloudy or prevent it from bonding.
- Applying too much sealer – This can create a sticky or overly shiny surface.
- Using the wrong applicator – A sprayer is best for even coverage, while a roller can be used for touch-ups.
Step 5: Maintain Your Sealed Pavers
Sealed pavers are much easier to maintain, but they still require care to stay in great condition.
How to Keep Your Pavers Looking Like New
- Sweep and rinse regularly – This prevents dirt buildup and keeps the surface clean.
- Use a mild detergent for deep cleaning – Avoid harsh chemicals that can break down the sealer.
- Remove stains quickly – If oil or food spills, clean it up right away to prevent staining.
- Reapply sealer every 2 to 3 years – Depending on traffic and weather exposure, resealing will keep your pavers protected.
Signs It’s Time to Reseal
- The color looks faded
- Water no longer beads up on the surface
- Stains are harder to remove
- The sand between pavers is washing away
If you notice these signs, it’s time to apply a fresh coat of sealer to keep your pavers in top shape.
Paver Sealing and Restoration: Should You DIY or Call a Pro?
Sealing pavers is an important step in protecting your outdoor surfaces, and many homeowners wonder whether they should tackle the project themselves or hire a professional. While sealing can be a DIY job, there are some key factors to consider before deciding which route to take. Professional paver sealing and restoration services offer long-lasting results, use high-quality materials, and can save you significant time and effort. If your pavers are looking dull, stained, or uneven, professional restoration may be necessary before sealing to ensure the best outcome.
If you’re trying to decide whether to take on paver sealing yourself or hire an expert, here’s a detailed look at the pros and cons of each approach.
DIY Paver Sealing: What You Need to Know
Many homeowners consider sealing their pavers themselves to save money. If you enjoy tackling home improvement projects and have the time and tools, sealing your own pavers can be a rewarding project. However, it requires careful preparation, the right materials, and attention to detail.
What Are the Benefits of DIY Paver Sealing?
- Cost Savings – You won’t have to pay for labor, which can save you money upfront.
- Control Over the Process – You can choose your own products and work at your own pace.
- Satisfaction of a Job Well Done – If completed correctly, DIY sealing can be a rewarding project.
What Are the Challenges of DIY Paver Sealing?
- Time-Consuming – Cleaning, sanding, and sealing can take a full weekend or longer, especially for larger areas.
- Requires the Right Tools – You’ll need a pressure washer, paver cleaner, polymeric sand, and a high-quality sealer, as well as a sprayer or roller for application.
- Potential for Mistakes – Uneven sealer application, streaking, or using the wrong product can lead to a poor finish that may require reapplication.
- Weather Sensitivity – Florida’s heat and humidity can make sealing tricky. If moisture is trapped under the sealer, it can cause cloudiness or prevent proper adhesion.
When Does DIY Make Sense?
DIY sealing is a good option if:
- Your pavers are in relatively good condition with no major stains or damage.
- You have the necessary tools and feel comfortable handling the project.
- You have the time to properly clean, sand, and seal the pavers without rushing.
- You’re sealing a smaller area, such as a walkway or patio, rather than a large driveway.
Professional Paver Sealing and Restoration: Why It’s Worth It
Hiring a professional takes the guesswork out of sealing and ensures the job is done right the first time. While it may cost more upfront, professional sealing provides long-term benefits that can save you money and stress down the road.
What Are the Benefits of Hiring a Professional?
- Expert Knowledge and Experience – Paver sealing experts understand the best techniques for different types of pavers and can spot potential issues before sealing.
- High-Quality Materials – Professionals use commercial-grade sealers that last longer and provide better protection against UV rays, moisture, and stains.
- Proper Surface Preparation – Experts will thoroughly clean and prep the pavers to ensure the sealer bonds correctly, preventing problems like peeling or cloudiness.
- Time-Saving – What might take you an entire weekend or longer can often be completed in a single day by a professional team.
- Even, Streak-Free Application – Professionals use specialized sprayers for a smooth, even coating that enhances the look of your pavers.
- Guaranteed Results – Many professional sealing services offer warranties, giving you peace of mind that your pavers will stay protected.
When Should You Hire a Pro?
- Your pavers are old, stained, or damaged – If your pavers are looking dull or uneven, they may need restoration before sealing. Professionals can deep-clean, remove stains, and re-level pavers if necessary.
- You have a large area to seal – Driveways and big patios require more effort, and a professional will ensure the sealer is applied evenly.
- You want a specific finish – If you’re looking for a high-gloss or wet-look finish, professional-grade sealers offer better and longer-lasting results.
- You’re unsure about the best sealer to use – Experts can recommend the right sealer for your specific pavers and climate conditions.
Understanding Paver Restoration: When Sealing Alone Isn’t Enough
If your pavers are stained, shifting, or have weeds growing between them, sealing alone won’t fix these issues. Paver restoration involves cleaning, repairing, and re-sanding before applying sealer to bring your pavers back to life.
What Does Paver Restoration Include?
- Deep Cleaning – Removing dirt, mold, and stains using professional-grade cleaning solutions and pressure washing.
- Joint Sanding – Replacing old, washed-out sand with polymeric sand to keep pavers stable and prevent weed growth.
- Paver Repair – Fixing sunken, loose, or uneven pavers to restore the original look and function.
- Sealing for Protection – Applying a high-quality sealer to enhance color, resist stains, and protect against wear and tear.
If your pavers haven’t been sealed in years, or if they have visible damage, a full restoration may be needed before sealing to ensure the best results.
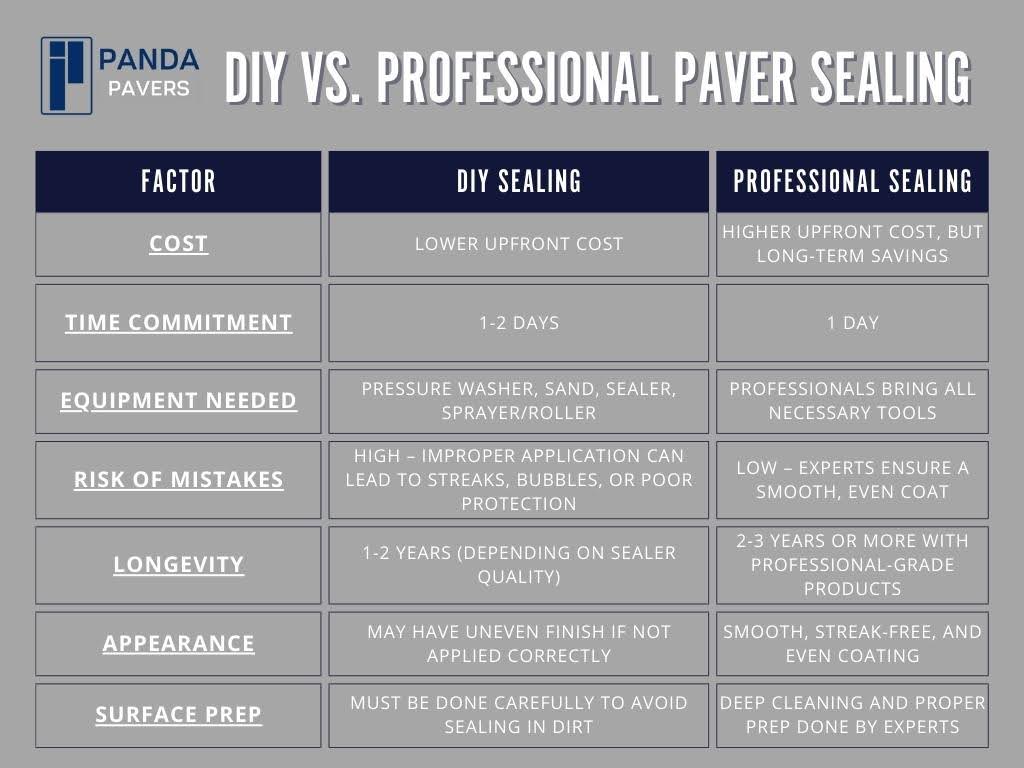
DIY vs. Professional Paver Sealing: A Quick Comparison
If you have a small area of pavers in good condition and are comfortable with the process, DIY sealing may be a good option. However, if you want long-lasting protection, an even application, and a hassle-free experience, hiring a professional is the best choice.
How to Seal Pavers in Florida: Protect Your Pavers
Sealing your pavers is one of the best ways to keep them looking great and protect them from Florida’s harsh weather. Whether you’re sealing new pavers or restoring older ones, following the right steps will help them last longer and stay beautiful.
Want to make sure your pavers get the best care? Contact Panda Pavers today to learn more about our professional paver sealing services!